Oracle SQLTXPLAIN SQLT Tutorial Example Part 1

There are many SQL Performance Tuning tools for Oracle Database spread out in the market. SQLTXPLAIN, shortly referred by SQLT is one that is becoming increasingly popular these days. This is a native performance tuning tool of Oracle, and can help to provide adequate diagnostic information for a SQL Query and help to increase the Query Performance by refining it. In this tutorial, we will try to harness the benefits and explain the usage of this tool. You will have to download the latest available version of the package provided by Oracle. We will be using version 11.4.2.7 of this Oracle tuning utility. This tutorial explains SQLT usage on a Oracle 11g Database. (11.2.0.1.0) You can still use this tutorial and comfortably use this tool against 9i and 10g versions of Oracle.


The tuning mechanism of SQLT connects to the Oracle Database to collect SQL execution plans, Optimizer statistics, metadata information and other performance specific metrics that influence the timing of a SQL statement execution.We will begin this series, by explaining how to install this utility for your database. Once this is completed, we can see how to optimize SQL queries using SQLTXPLAIN (SQLT).

The step by step installation instructions / installation guide for SQLTXPLAIN utility are documented below:

1) The utility installs in a new schema SQLTXPLAIN.If you have already made an attempt to install this tool, you can run the delivered uninstallation script to remove any traces of this tuning application.To do this, you have to execute “sqdrop.sql” located in sqlt/install directory.We will not look more into this as I don’t have this installed for my Database. If you do have, run this and clear your existing installation.

2) To begin installing SQLT, connect as SYSDBA and invoke the script “sqcreate.sql” located in sqlt/install directory. You will be prompted for a number of values during installation. The first among them is UDUMP directory. Refer to the log below
SQL> START sqcreate.sql
TADOBJ completed.
PL/SQL procedure successfully completed.
SQDOLD completed. Ignore errors from this script
... creating SQLT$ UDUMP/BDUMP/STAGE Server Directories
Notes:
1. Directories cannot contain "?", "*" or "$" symbols.
2. Specify existing server directories that ORACLE can access.
3. To accept a directory within [brackets] hit the "Enter" key.
Enter UDUMP directory (where traces are created).
Hit "Enter" key if you agree with recommended value below:
<A default location>
UDUMP directory:

3) UDUMP directory is where the trace files are created. You may wish to accept the recommended value or specify your own value.

4) Once this is done, you will prompted for BDUMP directory. [ Enter BDUMP directory (where PX traces are created) ]. Again, you can choose to accept the provided value or input your specific location for this.

5) After this is done, you will be prompted to enter STAGE directory.[Enter STAGE directory used as SQLT workarea (defaults to UDUMP).].I will leave the default location for this provided by Oracle during installation.

6) You will be prompted for optional connect identifier after this step. I learned from the help file that it needs to be used in some access restricted systems.This is NA for my installation, and I would prefer to skip this step.
Specify optional Connect Identifier (as per Oracle Net)
Include "@" symbol, ie. @PROD
If not applicable, enter nothing and hit the "Enter" key


7) We mentioned that this tool uses its own schema. You will be prompted to enter the password for this schema in the next step. Enter the password that you wish to.[ you will have to enter the password twice for confirmation ]
Define SQLTXPLAIN password (hidden and case sensitive).
Password for user SQLTXPLAIN:


8)You have to specify the SQLTXPLAIN Default Tablespace in the next step. Make sure that you have sufficient space in this tablespace.
Tablespace name is case sensitive.
Default tablespace [UNKNOWN]:


9) Specify the SQLTXPLAIN Temporary Tablespace in the next step. You will be provided with a list of temporary tablespaces to choose from at this step.
TEMPORARY_TABLESPACE
------------------------------
TEMP

Tablespace name is case sensitive.
Temporary tablespace [UNKNOWN]:

10) You have to mention the main application user in the next step. This depends on your application. I will enter HR here. If you are trying to install this for a PeopleSoft application, you should enter the PSFT application schema name. (SYSADM, PSFTADM etc).
The main application user of SQLT is the schema owner that issued the SQL to be analyzed.For example, on an EBS application you would enter APPS as the main application user.You will not be asked to enter its password.To add more SQLT users after this installation is complete simply grant them the SQLT_USER_ROLE role, or execute sqlt/install/sqguser.sql.
Main application user of SQLT:

11) As a last step, you can enter any additional license pack to which you have access to.
SQLT can make extensive use of licensed features provided by the Oracle Diagnostic and the Oracle Tuning Packs, including SQL Tuning Advisor (STA),SQL Monitoring and Automatic Workload Repository(AWR).To enable or disable access to these featuresfrom the SQLT tool enter one of the following values when asked:
"T" if you have license for Diagnostic and Tuning
"D" if you have license only for Oracle Diagnostic
"N" if you do not have these two licenses

Oracle Pack license [T]:

I will enter N at this stage. Once you provide all these inputs, the installation will begin. All required objects will be created at this stage. Some of the key steps performed at this stage include;
1) Installing required packages to support SQLT.
2) Create SQLT schema objects.
3) Migrating relevant objects from old to new repository.
4) Taking snapshots of some existing data dictionary objects

That is all you have to do to set up this performance tuning utility. We will discuss how to use this Oracle performance optimization tool in the upcoming posts.

Trace Application Engine Program PeopleSoft

Any normal PeopleSoft user will find it easy to perform an online application server trace after reading our earlier posts on Tracing PeopleCode. However, it is rather incomplete as it does not tell how to trace an Application Engine Program or COBOL Processes inside a PeopleSoft application. As a PeopleSoft Developer, I had to end up tracing my Application Engine Programs often and to those, who don’t know how to do it, it can turn into a fairly complex process.

In this post, we will explain how to perform a trace and pick up the trace file for Application Engine programs or any program that uses the PeopleSoft process scheduler.In order to do a trace for your AE program, navigate to the following location

PeopleTools –> Process Scheduler –> Process Definition

Now, you need to perform a search under Process Definition and open the program for which you need a trace. When you find your program, follow the steps provided in the screenshot below

Tracing PeopleSoft Application Engine Programs
Setting Trace Options for Application Engine Under Process Definition

1) First click on Override Options
2) Select “Append” from the Parameter List
3) Enter the trace options in the Text box against Parameter List
4) Hit Save on the page. The Application Engine program is now ready for tracing.

After you do this, every time you run the program the program will be traced by PeopleSoft automatically. You will have to reset or remove the trace options if you do not want to happen like this. You can also use SetTracePC and SetTraceSQL documented earlier, if you want to trace PeopleCode Programmatically. Another trace option is shown below

-TRACE 7 -TOOLSTRACEPC 4044  -TOOLSTRACESQL 31

Now, you have to note that you can use the options TOOLSTRACEPC and TOOLSTRACESQL together only when it is required as the output in both the cases will go to the same trace file. Your trace file can turn out to be quite big when you combine both these options. The trace can also be activated through the process scheduler configuration file. (psprcs.cfg). The equivalent settings in the process scheduler file are provided below

Settings in psprcs.cfg
Settings in Process Definition
Notes
TraceAE
-TRACE
Output is sent to Application Engine Trace (AET) file
TracePC
TOOLSTRACEPC
Output goes to PeopleCode trace file(.trc)
TraceSQL
TOOLSTRACESQL
Output goes to PeopleCode trace file (.trc)

To arrive at the trace bitmap numbers, you can follow the documentation below. Just add the numbers and set to the trace option accordingly.
; Bit       Type of tracing
; ---       ---------------
; 1         - Trace STEP execution sequence to AET file
; 2         - Trace Application SQL statements to AET file
; 4         - Trace Dedicated Temp Table Allocation to AET file
; 8         - not yet allocated
; 16        - not yet allocated
; 32        - not yet allocated
; 64        - not yet allocated
; 128       - Timings Report to AET file
; 256       - Method/BuiltIn detail instead of summary in AET Timings Report
; 512       - not yet allocated
; 1024      - Timings Report to tables
; 2048      - DB optimizer trace to file
; 4096      - DB optimizer trace to tables
TraceAE=0

PeopleSoft Add Image PDF File Example

In this tutorial, we will discuss how to add image to PDF files from PeopleSoft applications. We will be using the iText PDF API and integrate it with PeopleSoft for this example. I would also like to recommend reading the Java tutorial to Add image to PDF provided on this website earlier as the implementation in PeopleSoft would be closely aligned to that example. Once you have installed / configured itext to be used with PeopleSoft, you can follow the step-by-step procedure provided below to add an image file through Peoplecode to a new PDF document.

Step-1
We begin by declaring a Document and PdfWriter object from PeopleCode. These are the basic objects that you will be requiring whenever you create a PDF document from PeopleCode. Example below
Local JavaObject &Obj_InsertImagePDF_l = CreateJavaObject("com.lowagie.text.Document");
Local JavaObject &obj_writePDFoutput_l = GetJavaClass("com.lowagie.text.pdf.PdfWriter").getInstance(&Obj_InsertImagePDF_l, CreateJavaObject("java.io.FileOutputStream", "ImageInsertedFromPeopleCode.pdf", True));
&Obj_InsertImagePDF_l.open();

Step-2
The image file needs to be placed in the appropriate directory (application server / process scheduler, depending on how you place your PeopleCode). We will use the following image file for this example
Sample Image to Insert to PDF from PeopleCode
Sample Image for Inserting to PDF Document from PeopleCode
Step-3:
We will now declare an image object and set the properties like alignment, border width and border type for the image we will be placing into the PDF document.
Local JavaObject &Obj_imageobject_l = GetJavaClass("com.lowagie.text.Image").getInstance("InsertToPDF.jpg");
&Obj_imageobject_l.setAlignment(GetJavaClass("com.lowagie.text.Image").RIGHT | GetJavaClass("com.lowagie.text.Image").TEXTWRAP);
&Obj_imageobject_l.setBorder(GetJavaClass("com.lowagie.text.Image").BOX);
&Obj_imageobject_l.setBorderWidth(15);
Step-4:
We are done with basic image manipulation from PeopleCode, for putting in PDF file. You can now use Document.Add to add the image object to the Document and Close the Document. This would provide a new PDF document with an image inserted into it.
&Obj_InsertImagePDF_l.add(&Obj_imageobject_l);
&Obj_InsertImagePDF_l.close();
Step-5:
The complete code example to insert an image to PDF file using PeopleCode is provided below
Local JavaObject &Obj_InsertImagePDF_l = CreateJavaObject("com.lowagie.text.Document");
Local JavaObject &obj_writePDFoutput_l = GetJavaClass("com.lowagie.text.pdf.PdfWriter").getInstance(&Obj_InsertImagePDF_l, CreateJavaObject("java.io.FileOutputStream", "ImageInsertedFromPeopleCode.pdf", True));
&Obj_InsertImagePDF_l.open();
Local JavaObject &Obj_imageobject_l = GetJavaClass("com.lowagie.text.Image").getInstance("InsertToPDF.jpg");
&Obj_imageobject_l.setAlignment(GetJavaClass("com.lowagie.text.Image").RIGHT | GetJavaClass("com.lowagie.text.Image").TEXTWRAP);
&Obj_imageobject_l.setBorder(GetJavaClass("com.lowagie.text.Image").BOX);
&Obj_imageobject_l.setBorderWidth(15);
&Obj_InsertImagePDF_l.add(&Obj_imageobject_l);
&Obj_InsertImagePDF_l.close();
Note:
You may get more than one overload matches or no overload matches error when you run this example. It could be because of the version of iText.jar you are using. Refer to the reflection techniques examples provided earlier to solve such problems.You can also write a wrapper class alternatively to solve such problems.

iText Add Insert Image PDF File Example

In this tutorial, we will present an example that explains how to add images to PDF document using iText and Java. We will also discuss how to align images in PDF files, and go through some code examples that explain inserting images to PDF document. We will also see how to add different image formats to PDF file;JPEG, PNG, GIF, TIFF and BMP. Refer to the step by step instructions below to append a picture to a PDF document;

Step -1
We will create a Document Object and a PDFWriter object to begin with.
            Document Insert_Picture_PDF = new Document();
            PdfWriter.getInstance(Insert_Picture_PDF, new FileOutputStream("AddImage.pdf"));
Step-2
The image file we will be adding to the PDF document is shown below. We will provide a JPG example to start with. Copy this image file and place it in the same directory where your class file will reside.
Insert Image to PDF File Using Itext
iText Add Image to PDF File
Step-3
We now get an instance of the Image to be added inside an Image object. This can be achieved using the code example below
            Image To_be_Added = Image.getInstance("InsertImage.jpg");
Step-4
It is also possible to provide options for the file being inserted. You can specify the border type, alignment, border width, border color etc. It is also possible to scale the image to the required dimensions. We will do some of them for our image using the code below
            To_be_Added.setAlignment(Image.RIGHT | Image.TEXTWRAP);
            To_be_Added.setBorder(Image.BOX);
            To_be_Added.setBorderWidth(15);
Step-5
Once this is done, you can use document.add to insert the image into the PDF document. We will add the image file to the PDF and close the Document object using the code below
            Insert_Picture_PDF.add(To_be_Added);
            Insert_Picture_PDF.close();

The complete code example for this tutorial is provided below
import java.io.FileOutputStream;
import com.itextpdf.text.Image;
import com.itextpdf.text.pdf.*;
import com.itextpdf.text.*;
public class image {
    public static void main(String[] args) {
        try {
            Document Insert_Picture_PDF = new Document();
            PdfWriter.getInstance(Insert_Picture_PDF, new FileOutputStream("AddImage.pdf"));
            Insert_Picture_PDF.open();
            Image To_be_Added = Image.getInstance("InsertImage.jpg");            
            To_be_Added.setAlignment(Image.RIGHT | Image.TEXTWRAP);
            To_be_Added.setBorder(Image.BOX);
            To_be_Added.setBorderWidth(15);            
            Insert_Picture_PDF.add(To_be_Added);
            Insert_Picture_PDF.close();           
        }
        catch (Exception i1) {
            i1.printStackTrace();
        }
    }
}
Just make sure that your document object is opened using "Open" method. Otherwise, at run time you will get the following exception
com.itextpdf.text.DocumentException: The document is not open yet; you can only
add Meta information.

If you open the resulting PDF document, you will find your image file inserted into it. A screen shot of the output PDF document is shown below
Image Inserted in PDF Document
Image file inside the PDF document
Note that the image has some border (as specified in code) and is right aligned. More iText image tutorials to follow..

GoldenGate Subdirectories List Usage

In our GoldenGate installation Guide, we mentioned that you have to execute CREATE SUBDIRS command as a part of the installation, which would create the required working directories for the GoldenGate program to work properly. In this post,we will provide a short explanation of what each of these sub directories mean and their importance in the functionality of the program as a whole. [ An excerpt from Oracle Documentation ]

dirchk
This sub-directory contains the checkpoint files created by Extract and Replicat processes, which store current read and write positions to support data accuracy and fault tolerance. Written in internal GoldenGate format.

The File name format is . where is a sequential number appended to aged files and is either cpe for Extract checkpoint files or cpr for Replicat checkpoint files.

Examples:
ext1.cpe
rep1.cpr

dirdat
This is the default location for GoldenGate trail files and extract files created by Extract processes to store records of extracted data for further processing, either by the Replicat process or another application or utility. Written in internal GoldenGate format.

File name format is a user-defined two-character prefix followed by either a six-digit sequence number (trail files) or the user-defined name of the associated Extract process group (extract files).

Examples:
rt000001
finance

dirdef
The default location for data definitions files created by the DEFGEN utility to contain source or target data definitions used in a heterogeneous synchronization environment. Written in external ASCII. File name format is a user-defined name specified in the DEFGEN parameter file.These files may be edited to add definitions for newly created tables.

Example:
defs.dat

dirpcs
Default location for status files. File name is . where is the name of the group and is either pce (Extract), pcr (Replicat), or pcm (Manager). These files are only created while a process is running. The file shows the program name, the process name, the port and process id that is running.

Examples:
mgr.pcm
ext.pce

dirprm
The default location for GoldenGate parameter files created by GoldenGate users to store run-time parameters for GoldenGate process groups or utilities. Written in external ASCII format. File name format is .prm or mgr.prm.These files may be edited to change GoldenGate parameter values. They can be edited directly from a text editor or by using the EDIT PARAMS command in GGSCI.

Examples:
defgen.prm
finance.prm


dirrec
Currently not used by GoldenGate.

dirrpt
The default location for process report files created by Extract, Replicat, and Manager processes to report statistical information relating to a processing run. Written in external ASCII format.File name format is .rpt where is a sequential number appended to aged files.
Examples:
FIN2.rpt
MGR4.rpt

dirsql
The default location for scripts created by the TRIGGEN utility to contain SQL syntax for creating GoldenGate logging triggers and GoldenGate log tables. Written in external format.File name format is a user-defined name or the defaults of GGSLOG (table-creation script) or the table name (trigger-creation script), with the extension of .sql.

Examples:
ggslog.sql
account.sql

dirtmp
The default location for storing large transactions when the size exceeds the allocated memory size. 

Javascript Array Example FAQ

Let us see how to declare a Javascript Array and use basic Javascript array functions and methods in this post, with examples. This tutorial on Javascript Arrays, is targetted towards beginners who are looking for some demonstration code in using the Array object.The tutorial is implemented as a How To kind, which can help you to be spot on with your Array concept needs. Here is a step by step learning FAQ for Javascript Arrays.

1) How to create a new array object in Javascript?

To create a new array Object in Javascript, use the sample code provided below
<script type="text/javascript">
var createArray=new Array();
</script>

2) How to find the array length of an Array object?

To find the length of an Array object in Javascript or to count the number of elements in an Array, you can use the "length" property. "Arrayobject.length" would help you to find the number of elements in a Javascript Array. For an empty Array, the number of elements is always 0.
var myArrayLength=createArray.length;

3) How to set the size of an Array, when declaring it?

To predefine the size of an Array at the time of creation, you can pass the size parameter as a number to the constructor. As an example, you can do as provided below
var createArray=new Array(200);
This example creates an array with a predefined length of 200. When you assign a value for the 200th array element, then the array resizes itself automatically and this does not throw an error.

4) After declaring, how to add elements to a Javascript Array?

To populate a Javascript Array by, you can just refer to the element number and push the required data into it. An example for entering data into a Javascript Array is provided below;
<script type="text/javascript">
var createArray=new Array(3);
createArray[0]='first element';
createArray[1]='Second element';
createArray[2]='Third element';
</script>

5) What are the different methods of entering data in a Javascript Array?

Apart from the approach given earlier, you can also push data into an Array by using the example code provided below; [ you need not refer to the array element in this method ]
<script type="text/javascript">
var createArray=new Array(3);
createArray[createArray.length]="first element";
createArray[createArray.length]="Second element";
createArray[createArray.length]="Third element";
</script>

If you know all the array parameters beforehand, you can directly create the array by using the code provided below;

var createArray=new Array("first element","Second element","Third element");

6) How to remove data from a Javascript Array?

You can use the DELETE method to delete an element from a Javascript Array. Removing an element from the array using this method, does not reduce the length of the array. To remove the third array element, you can use an example as provided below
delete createArray[2]; //deletes the second element from the Array, but the length of the array does not change

Add Facebook Send Button Blogger

I have been writing about adding Facebook Send Button to Blogger post for the past few days. We saw multiple approaches to add Facebook Share Button and I would like to present a summary of different approaches for configuring Facebook Social Sharing Plugin to your blog [ with Code ]:

Method 1:

In this method, you edit the Blogger template and add the send button to your blog post. You will be able to position your Send button anywhere inside your blog with this approach. This method is suitable, if you know very well on how to edit your blogger template. In the example we have provided, we have shown how to add the send button below the blogger title of your blog. This will suit to your design and position accurately.

Method 2:

In this method, you can directly add the new send button as a widget / gadget to your blog post. We have developed a Facebook send button widget which you can add to your website and plug it as a gadget to your blog.  This approach can best fit your job if you are not bothered about editing the blogger template and want something as a page element inside your blog. It has got some positioning limitations and may not fit in all the places. To do this, you have to follow the approach 1 explained earlier.

Method 3:

This is same as Approach 2, the difference being in the fact that you can load the widget XML to your own website and load it to your blogger blog. But you may miss any future changes brought into this widget..

Method 4:

This is an easy approach and is recommended for those who are after:

1) Putting both like and send buttons together in your blog
2) Combining both recommend and send button together in your blog

You do a small tweak to your existing like or recommend button code in blogger and add the send button also. You can see a live demonstration of this in this website itself where this setting (send=true) is incorporated. A detailed tutorial on how to do this is available in this blog. If you have enabled Facebook insights for your blog, then you can also get detailed analytics for your send button in Facebook directly. This method is not suitable if you have not implemented Facebook LIKE or RECOMMEND buttons.

After using any of these defined approaches, you have to check if the button is properly installed in your website. You can  do this by checking a preview. Also, the Send button uses some window space to compose a message and make sure that it does not get ugly when you place it in your sidebar. If you get any issues while installing the Send button code in your blogspot site, you can share it with us. We will try to troubleshoot your issue and resolve it.

Blogger Combine Like Send Button

I just learned an interesting note on the Send Button for Facebook. It is possible to combine both LIKE and SEND button together, by just adding an addition option for the LIKE button, if you already have one in your blog. An example image is provided below;

Facebook - Both Like and Send Buttons
The like button code has got a new attribute called "Send". If you set this attribute to "True", then you will automatically get the Send button next to your like button in your blog. So, how does this impact a standard blogger blog? You have to find where you have placed your "like" button code in your blog.

Once you find the code for your LIKE button in blogger, you have to add the "Send" attribute to it and set it to "true". This will show both LIKE and SEND buttons in your blogger depending on your placements. They will appear adjacent to each other in your blogger blog. 

For example, if you find the existing code like this;

<fb:like action='recommend' font='verdana' send='true' show_faces='false' width='500'/>

You have to modify it to include send button code by changing this section as shown below
<fb:like action='recommend' send='true' font='verdana' send='true' show_faces='false' width='500'/>

I have done this for my blogger post, and I'm getting a neat Send button below the title. This works for "Recommend" button as well..i.e. you can combine "Recommend" button and "Send" button together. If you want to know, how to add the send button below the blog post title, you can refer to the related post section below.

You can start to Like and Send together.Handy!..

Facebook Send Button Gadget Blogger

In our previous post, we discussed how to add Facebook Send Button Gadget to Blogger, as "Add your Own" option in Blogger. Some highlighting features of this Gadget are provided below;

1)  You can customize the title and height of this gadget. 

2)  For developers, who are keen to introduce more configuration options for this Gadget, they can customize the XML code and add their own options like width, and user preferences to capture Facebook insights.

3) You can also host the gadget code on your domain and provide the link to the XML file from your domain if you wish not to use the existing one.

4) Developers can also add a one click install for this Gadget if they wish to by wrapping up the Gadget code inside a FORM. More help on this is available in the Blogger API code from Google.

5) Inside the Gadget code,you can change the font from Verdana to any supported font by Facebook. You can also change the color scheme to light from dark.

And as always, you can keep watching this space for updates to the Gadget. We are planning to introduce more user preferences as we move on which would make this a complete Gadget with more configuration options. Follow us on twitter, and you will never miss a single update on this Gadget.

Best Facebook Send Button Widget for Blogger / Blogspot

In this post, we will see how to add the Facebook Send Button as a widget to your blogger blog. This is the simplest way to add the Send button widget for those who are novice to HTML and Javascript or tweaking Blogger templates. I have also tested this on my test blog and it works fine.I have also given the source code of the widget at the end which could be useful for developers. To add the Facebook Send button widget to your blog post, follow the instructions as provided below:

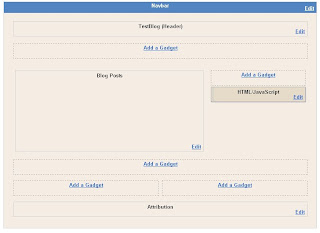
1) In your blogger blog, navigate to Design -> Page Elements. When you do this, you will get a "Add and Arrange Page Elements Screen" as shown below.
Facebook Send Button Blogger Page Elements
Page Elements Screen to Add Facebook Send Button Widget

2) Your screen may look different depending on the number of Gadgets you have added. Now, click on "Add a Gadget". You will get a pop-up window, in which you have to select "Add your Own" option.
Add Send Button as Gadget
Add your Own Option - Facebook Send Button
3) When you click on Add your own, you will get a window to enter a HTTP URL. Enter http://sites.google.com/site/ultithoughts/send_button_widget.xml in that box and click on "Add by URL". You will get a preview page  when you do this. Both the pages are shown below
Add your Own Send Button Widget for Blogger
Enter URL to Add Send Button Widget for Blogger

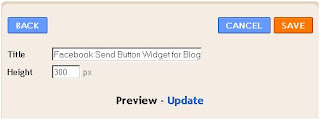
4) The preview page or rather "configure gadget" page, allows you to specify the title and height of the widget.This is shown below
Preview of the Widget
Configure Gadget - Send Button Widget

5) Click on "Save" and you are done. The Gadget will be added to your page elements and when you see your blog, you will get a nice looking "Send Button". The complete widget code for technical enthusiasts is provided below
<?xml version="1.0" encoding="UTF-8"?>
<Module>
<ModulePrefs height="300" title="Facebook Send Button Widget for Blogger">
  <Require feature="skins"/>
  <Require feature="views"/>
 </ModulePrefs>
 <Content type="html">
   <![CDATA[
<div id="fb-root">
<script src="http://connect.facebook.net/en_US/all.js#appId=APP_ID&xfbml=1"></script><fb:send href="" font="verdana" colorscheme="dark"></fb:send>
  ]]>
  </Content>
</Module>
6)A sneak preview of how this widget will look on your webpage is provided below
Send Button Preview on Blogger
Send Button Preview

Facebook Send Button Widget Blogger

I was doing a prototype on building a Send button widget for Blogger application. It came out pretty well, except that it is in the initial stages and there is a good scope for customization. This post is for blogger users who need not bother much about HTML and Javascript stuff to add a "Send Button" widget to their blogger website. Rather, they can add this as a widget if they wish to. Keep watching this space, we will come up with a widget..

Add Facebook Send Button for Blogger Blogspot

In our previous post, we introduced the new Facebook Send Button for Blogger. In this post, we will present a short tutorial on integrating the Facebook send button to your blogger template. I would like this send button to come just below my blog post title. But, you can just extend this tutorial to place it anywhere on your blog. So, to get started, navigate to the URL given in our initial Send button tutorial for Blogger and get your code for the Send Button. You can follow the steps given below, once you have the code.

1) In Blogger, navigate to Design. Click on Edit HTML. Check on "Expand Widget Templates". Take a complete backup of your current template, before we add the code for Send button. Example screeshot below:
Add Facebook Send Button - Edit Blogger Template
Backup Your Blogger Template -  Facebook Send Button Addition

2) Now, Find the tag in your template, and add the following code just above it
<script src="http://connect.facebook.net/en_US/all.js#appId=APP_ID&amp;xfbml=1"></script>

3)Now, inside your template, find the location where you want to place the "Send Button" and add the following piece of code
<fb:send href="example.com" font="tahoma" colorscheme="dark"></fb:send>
4) The code given in step (3) is sample only. You can replace it with the code generated from Facebook page. To place it below the Title URL, you can find the "a expr:href='data:post.url'" in your template and add it below the template as shown in the section below
        <b:if cond='data:post.url'>
          <a expr:href='data:post.url'><data:post.title/></a>&lt;br&gt;<fb:send href="example.com" font="tahoma" colorscheme="dark"></fb:send>

And that is it..If you click on preview, you will get the "Send" button showing up on your blog post.

Blogger Add Facebook Send Button

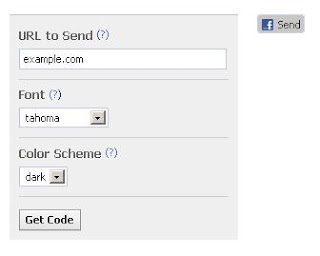
In this blog post, we will explain how to add the Facebook Send Button to your blog post hosted on blogger / blogspot. "Send" button is a recent addition by Facebook, introduced quite recently. To add the Send Button on your blogger blog post, navigate to the following link and select your options. The options you have pick are

1) URL to Send -> You can leave this blank
2) Font -> The font for the Send Button
3) Color Scheme -> You can choose between light and dark

A sample screen to configure these options is provided below
Facebook Send Button Configuration
Adding a Facebook Send Button for Blogger
Now, you can click on Get Code and this will give you a nice looking code, which you can integrate into your blogger template. The good news is that the Facebook Send button is integrated to the Facebook insights, which gives you accurate statistics on what happened with your Send button after placement. You can add a custom HTML page element and put the Facebook code in that, or you can also integrate it inside your blogger template (if you are an advanced blogger user). Recommend, like and Send this to your network!.

Javascript HTTP Request Tutorial Using JQuery

In our previous post, we discussed the basics of triggering a HTTP request through Javascript using the XMLHttpRequest object. In this short tutorial, we will discuss how to invoke a HTTP request through JQuery framework . To get started with this, you will have to include the JQuery library into your HEAD section of the HTML page, by using the code snippet given below.
  <head>
  <script type="text/javascript" src="http://ajax.googleapis.com/ajax/libs/jquery/1.5.1/jquery.min.js"></script>
  </head>
You will really appreciate the power of JQuery, as it makes the coding much easier. This will be evident from the subsequent steps that we will be using to access a different page. (This example is for HTTP GET request only, a POST example will be provided shortly). We will create a sample HTML page, that will be loaded from the main HTML page. (call it, samplepage.html). The content of the example page is provided below
<html>
<body>
Invoked via GET Request, JQuery
</body>
</html>  
We have the test page ready, have loaded the JQuery library; The code to invoke the HTTP GET request is provided below
  <html>
  <head>
  <script type="text/javascript" src="http://ajax.googleapis.com/ajax/libs/jquery/1.5.1/jquery.min.js"></script>
  </head>
    <body>
      <div id="result"></div>
    <script>
    $.get('samplepage.html', function(data) {
                    $('#result').html(data);
                    alert('A Javascript HTTP Request was Triggered using JQuery');
    });
    </script>
    </body>
  </html>  
Wow, look at the code reduction when done through JQuery.You can test this example by yourself. When you load the test page, it will invoke a GET request and load the data into the main page in the div "result". Note that we are referencing the div using "#result" in the JQuery code snippet. This looks a lot cleaner than the original XMLHttpRequest example. If you are writing a widget in Javascript, that already uses the JQuery library, then you can afford to use this method to trigger a GET request if required. But, it is not possible to create cross domain HTTP requests using JQuery.(if you know, you can share it).

In the next post, we will discuss, how to create a HTTP request call using Prototype Javascript framework.

Javascript HTTP Request Example Tutorial - XMLHttpRequest

In this blog post, we will see how to trigger a HTTP request through Javascript with a simple example. There are many different ways to invoke a HTTP request, and we will cover all the different types of approaches that exist in the web world to call a web request. The Javascript example presented in this post, are targetted towards beginners. One of the popular method to call an external webpage / internal script is through the XMLHTTPRequest object in Javascript. We will discuss how to do a HTTP GET request with this object.
  <html>
    <script>
      var HTTP_Response_Holder = null ;  
      function loadHTTPData() {
        if (typeof window.ActiveXObject != 'undefined' ) {
          HTTP_Response_Holder = new ActiveXObject("Microsoft.XMLHTTP");
          HTTP_Response_Holder.onreadystatechange = process ;
        }
        else {
          HTTP_Response_Holder = new XMLHttpRequest();
          HTTP_Response_Holder.onload = process ;
        }
        HTTP_Response_Holder.open( "GET", "<your HTTP URL >", true );
        HTTP_Response_Holder.send( null );
      }
  
      function process() {
        if ( HTTP_Response_Holder.readyState != 4 ) return ;
         document.getElementById("output").innerHTML = HTTP_Response_Holder.responsetext ;         
         var links=output.getElementsByTagName("a");     
         var i=0;
         for(i=0;i<links.length;i++)
         {        
                 //do some processing
                
         }       
      }              
    </script>  
    <body>
      <div id="output"></div>
      <button onclick="loadHTTPdata()">LoadData</button>     
    </body>
  </html> 
In this method, we invoke the "loadHTTPdata" function on click of "LoadData" button. This invokes the javascript function, which then uses the XMLHttpRequest object, and invokes a GET request. When this request is successful, it invokes a "process" function. As an example, we have extracted all the hyperlink tags in the document inside this function using the "getElementsByTagName" method.

This approach is straight forward and can be easily plugged into your widget or any javascript code. You can also pass some parameters to this HTTP request and use POST instead of GET if required. That would mean, it is also possible to trigger a PHP or JSP script through this method. To grab the response of the HTTP request, we use the "responsetext" method. In the next post, we will see how to invoke a HTTP request through JQuery. We will also discuss how to achieve the same result using Prototype Javascript framework in subsequent blog posts.

HSC +2 Chemistry Nuclear Chemistry - CC1- Chapter Wise Questions

Final post of this series. Questions on Nuclear Chemistry chapter is provided below for practice. Post your answers in the comments section to these questions.

99) The phenomenon of radioactivity was discovered by:

a) Madam Curie

b) Pierre Curie

c) Henry Becquerrel

d) Rutherford

100) The most penetrating radiations are:

a) $ \alpha $ rays

b) $ \gamma $ rays

c) $ \beta $ rays

d) all are equally penetrating

101) In the nuclear reaction, $ _{92}U^{238} \rightarrow \; _{82}Pb^{206} $, the number of $ \alpha $ and $ \beta $ particles emitted are:

a) $ 7\alpha, \; 5\beta $

b) $ 6\alpha, \; 4\beta $

c) $ 4\alpha, \; 3\beta $

d) $ 8\alpha, \; 6\beta $

102) Which one of the following particles is used to bombard $ _{13}AI^{27} $ to give $ _{15}P^{30} $ and a neutron:

a) $ \alpha $ particle

b) deuteron

c) proton

d) neutron

103) The reaction $ _{5}B^{8} \rightarrow \; _{4}B^{8} $ takes place due to:

a) $ \alpha $ decay

b) $ \beta $ rays

c) electron capture

d) positron decay

104) Radioactivity is due to:

a) stable electronic configuration

b) stable nucleus

c) unstable nucleus

d) unstable electronic configuration

105) In the following radioactive decay, $ _{92}X^{232} \rightarrow \; _{89}Y^{220} $, how many $ \alpha $ and $ \beta $ decay particles are ejected.

a) $ 3\alpha, \; 3\beta $

b) $ 5\alpha, \; 3\beta $

c) $ 3\alpha, \; 5\beta $

d) $ 5\alpha, \; 5\beta $

106) $ _{92}U^{235} $ nucleus absorbs a neutron and disintegrates into $ _{54}Xe^{139}, \; _{38}Sr^{94} $ and x. What will be the product x?

a) 3 neutrons

b) 2 neutrons

c) $ \alpha $ particle

d) $ \beta $ particle

107) Loss of a $ \beta $ particle is equivalent to:

a) Increase of one proton only

b) Decrease of one neutron only

c) Both (a) and (b)

d) None of these

108) Which of the following is used as neutron absorber in the nuclear reactor?

a) Water

b) Deuterium

c) Some compound of Uranium

d) Cadmium

HSC +2 Chemistry coordination compounds - CC1- Chapter Wise Questions

Chapter wise questions on "Coordination Compounds" is provided below.

81) Which is a double salt?

a) $ K_{2}SO_{4}.Al_{2}(SO_{4})_{3}.24H_{2}O $

b) $ NaCl $

c) $  K_{4}[Fe(CN)_{6}] $

d) $ KCl $

82) An example of a complex compound having co-ordination number 4.

a) $ K_{4}[Fe(CN)_{6}] $

b) $ [Co(en)_{3}]Cl_{3} $

c) $ [Fe(H_{2}O)_{6}]Cl_{3} $

d) $ [Cu(NH_{3})_{4}]Cl_{2} $

83) The geometry of $ [Cu(NH_{3})_{4}]^{2+} $ complex ion:

a) Linear

b) Tetrahedral

c) Square planar

d) Angular

84) An example of chelating ligand is:

a) $ NO_{2}^{-} $

b) Chloro

c) Bromo

d) en

85) The geometry of complex ion $ [Fe(CN)_{6}]^{4-} $ is:

a) tetrahedral

b) square plannar

c) Octahedral

d) triangular

86) The oxidation number of Nickel in the complex ion, $ [NiCl_{4}]^{2-} $ is:

a) +1

b) –1

c) +2

d) –2

87) Which is not an anionic complex:

a) $ [Cu(NH_{3})_{4}]Cl_{2} $

b) $ K_{4}[Fe(CN)_{6}] $

c) $ K_{3}[Fe(CN)_{6}] $

d) $ [NiCl_{4}]^{2-} $


88) The geometry of $ [Ni(CN)_{4}]^{2-} $ is:

a) Tetrahedral

b) Square planar

c) Triangular

d) Octahedral

89) An example of an ambidentate ligand is:

a) $ CN^{-} $

b) $ Cl^{-} $

c) $ NO_{2}^{-} $

d) $ I^{-} $

90) $ [FeF_{6}]^{4-} $ is a para-magnetic because:

a) $ F^{-} $ is a weaker ligand

b) $ F^{-} $ is a strong ligand

c) $ F^{-} $ is a flexidentate ligand

d) $ F^{-} $ is a chelating ligand

91) In $ [Fe^{11}(CN)_{6}]^{4-} $, the central metal ion is:

a) Fe

b) $ Fe^{+2} $

c) $ Fe^{+3} $

d) $ CN^{-} $

92) The co-ordination number of Ni(H) in $ [Ni(CN)_{4}]^{2-} $ is:

a) 2

b) 4

c) 5

d) 6

93) The name of $ [Pt^{IV}(NH_{3})_{2}Cl_{2}]^{2+} $ is:

a) Diamminedichloroplatinum(IV) ion

b) Diamminedichloroplanitate(IV)

c) Diamminedichloroplatinum

d) Dichlorodiammineplatinum(IV) ion

94) For a comound $ K_{4}[Fe(CN)_{6}] \rightarrow  4K^{+} + [Fe(CN)_{6}]^{4-} $, the complex ion is:

a) $ K^{+} $

b) $ CN^{-} $

c) $ Fe^{II} $

d) $ [Fe(CN)_{6}]^{4-} $

95) A metal ion from the first transition series forms an octahedral complex with magnetic moment of 4.9 BM and another octahedral complex which is diamagnetic. The metal ion is:

a) $ Fe^{2+} $

b) $ Co^{2+} $

c) $ Mn^{2+} $

d) $ Ni^{2+} $ 

96) Paramagnetic moment is expressed in:

a) Debye unit

b) K Joules

c) BM

d) ergs

97) The type of isomerism found in the complexes $ [Co(NO_{2})(NH_{3})_{5}]SO_{4} $ and $ [Co(SO_{4})(NH_{3})_{5}]NO_{2} $ :

a) Hydrate isomerism

b) Coordination isomerism

c) Linkage isomerism

d) Ionisation

98) Valence bond theory does not explain the property of complex compound:

a) geometry

b) magnetic

c) nature of ligand

d) colour

HSC +2 Chemistry f Block elements - CC1- Chapter Wise Questions

Questions 67-80 are from f Block elements chapter of chemistry. Post your answers to these questions in the comments section. For all other chapter wise questions, refer to the related post section below.

67) The electronic configuration of Lanthanides is:

a) $ [Xe]4f^{0}5d^{0}6s^{0} $

b) $ [Xe]4f^{1-7}5d^{1}6s^{1} $

c) $ [Xe]4f^{1-14}5d^{1}6s^{2} $

d) $ [Xe]4f^{1-14}5d^{1-10}6s^{2} $

68) The electronic configuration of Actinides is:

a) $ [Rn]5f^{0-14}6d^{0}7s^{0} $

b) $ [Rn]5f^{0-14}6d^{0-2}7s^{0} $

c) $ [Rn]5f^{0-14}6d^{0-2}7s^{1} $

d) $ [Rn]5f^{0-14}6d^{0-2}7s^{2} $

69) The lanthanide contraction is responsible for the fact that:

a) Zn and Y have about the same radius

b) Zr and Nb have similar oxidation state

c) Zr and Hf have about the same radius

d) Zr and Zn have the same oxidation state

70) The most common oxidation state of lanthanides is:

a) +2

b) +1

c) +3

d) +4

71) Lanthanides are extracted from:

a) Limonite

b) Monazite

c) Magnetite

d) Cassiterite

72) The elements in which the extra electron enters (n-2)f orbitals are called:

a) s-block elements

b) p-block elements

c) d-block elements

d) f-block elements

73) The lanthanide contraction is due to:

a) perfect shielding of 4f electron

b) imperfect shielding of 4f electron

c) perfect shielding of 3d electron

d) imperfect shielding of 3d electron

74) Ceria is used in:

a) toys

b) tracer bullets

c) gas lamp materials

d) none of the above

75) ……………. is used in gas lamp material:

a) $ MnO_{2} $

b) $ CeO_{2} $

c) $ N_{2}O_{5} $

d) $ Fe_{2}O_{3} $

76) Alloys of Lanthanides are called as:

a) Mish-metals

b) Metalloids

c) Plate metals

d) Actinides

77) Metallothermic processes involving Lanthanides are called as:

a) Aluminothermic process

b) Lanthanido-thermic process

c) Reduction process

d) Oxidation process

78) ………. form oxocations:

a) Lanthanides

b) Actinides

c) Noble gases

d) Alkali metals

79) Maximum oxidation state exhibited by Lanthanides is:

a) +1

b) +2

c) +3

d) +4

80) Lanthanides are separated by:

a) Fractional distillation

b) Steam distillation

c) Fractional crystallization

d) Sublimation