XLSX - Conditional Formatting - Introduction
In the last post, we introduced you to conditional formatting of XLS workbook using Java and Apache POI. In this article, we will discuss how to apply conditional formatting to XLSX workbooks using Java and POI. We will see some different example in this post, and also discuss some additional formatting options that are available at our disposal with POI. Let us get started.
Input Sheet - Conditional Formatting situation
Refer below to a worksheet of data;
 |
| XLSX Conditional Formatting - Java POI Example - Input Data |
XLSX - Conditional Formatting - Java Example Program
The XLSX program is same as the XLS one, except that we use different classes to get the end result. The steps that needs to be followed to apply conditional formatting to XLSX documents is provided below:
- Create XLSX document, add test data
- Get conditional formatting facet layer - XSSFSheetConditionalFormatting
- Create Rule based on our requirements - XSSFConditionalFormattingRule
- Define Fill Color / Pattern for the cells that satisfy the rule
- Define Cell Range to apply conditional formatting
- Attach Cell Range with the Rule
import java.io.*;
import org.apache.poi.xssf.usermodel.*;
import org.apache.poi.ss.usermodel.*;
import org.apache.poi.ss.usermodel.ComparisonOperator;
import org.apache.poi.ss.usermodel.IndexedColors;
import org.apache.poi.ss.util.CellRangeAddress;
public class ConditionalFormattingXLSX {
        public static void main(String[] args) throws Exception{
                /* Create Workbook and Worksheet - Add Input Rows */
                XSSFWorkbook my_workbook = new XSSFWorkbook();
                XSSFSheet my_sheet = my_workbook.createSheet("XLSX_Conditional_Formatting");
                Row row = my_sheet.createRow(0);
                Cell cell = row.createCell(0);
                cell.setCellValue(new Double(7));
                row = my_sheet.createRow(1);
                cell = row.createCell(0);
                cell.setCellValue(new Double(22));
                row = my_sheet.createRow(2);
                cell = row.createCell(0);
                cell.setCellValue(new Double(15));
                row = my_sheet.createRow(3);
                cell = row.createCell(0);
                cell.setCellValue(new Double(33));

                /* Access conditional formatting facet layer */
                XSSFSheetConditionalFormatting my_cond_format_layer = my_sheet.getSheetConditionalFormatting();

                /* Create a Rule - greater than rule , to pick all cells greater than 15 */
                XSSFConditionalFormattingRule my_rule = my_cond_format_layer.createConditionalFormattingRule(ComparisonOperator.GT, "15");

                /* Define font formatting if rule is met */
                /* RED color for all matching cells */
                XSSFFontFormatting my_rule_pattern = my_rule.createFontFormatting();
                my_rule_pattern.setFontColorIndex(IndexedColors.RED.getIndex());

                /* Set background fill to Yellow for matching rows */
                XSSFPatternFormatting fill_pattern = my_rule.createPatternFormatting();
                fill_pattern.setFillBackgroundColor(IndexedColors.YELLOW.index);

                 /* Create a Cell Range Address */
                CellRangeAddress[] my_data_range = {CellRangeAddress.valueOf("A1:A4")};

                /* Attach rule to cell range */
                my_cond_format_layer.addConditionalFormatting(my_data_range,my_rule);

                /* Write changes to the workbook */
                FileOutputStream out = new FileOutputStream(new File("C:\\conditonal_formatting_output.xlsx"));
                my_workbook.write(out);
                out.close();

        }
}
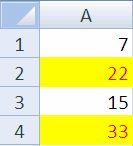
Now, use ComparisonOperator.GT to trigger a greater than comparison. We also use XSSFPatterFormatting class to create a background fill color of Yellow to the matching cells. The output of this program is shown below:
 |
| XLSX - Java POI Conditional Formatting - Output Example |
A very neatly formatted output, that we were after. That completes the tutorial on conditional formatting for XLSX documents. We are now ready to see some complex conditional formatting examples. like multiple rues etc. We will discuss them soon. Stay connected.
How can I set a custom background color?
ReplyDelete